Squid Bruschetta
Squid was a culinary mystery
to me for a long time. You either cook it for a few minutes or an hour; anywhere in
between, and it becomes tough, like chewing on rubber bands. (Not that I chew on
rubber bands often enough to say what that’s like.) Why is this?
The collagen in squid and octopus is enjoyable in either its native state
or hydrolyzed state, but not in its denatured state. It takes a few minutes to
denature, so with just a quick pan sear it remains in its native state (tossed with
some fresh tomatoes and dropped on top of bruschetta, it’s delicious). And hydrolysis
takes hours to occur, so a slowly simmered braised octopus turns out fine. Braising it
in tomatoes further helps by dropping the pH levels, which accelerates the hydrolysis
process.
To make a simple squid bruschetta, start by preparing a loaf of French or Italian
bread by slicing it into ½″ (1 cm) slices. You can create larger slices by cutting on a
bias. (Save the triangular end piece for munching on when no one is looking.) Lightly
coat both sides of the bread with olive oil (this is normally done with a pastry brush,
but if you don’t have one, you can either fold up a paper towel and “brush” with it or
pour olive oil onto a plate and briefly dip the bread into the oil). Toast the bread. A
broiler works best (the slices of bread should be 4–6″ / 10–15 cm from the heat). Flip
as soon as they begin to turn golden brown. If you don’t have a broiler, you can use an
oven set to 400°F / 200°C. For small batches, a toaster also works.
Once your bread is toasted, place it on a plate and store it in the oven (with the
heat off) so that it remains warm.
Prepare the squid:
1 lb (500g) squid (either a mix of bodies and tentacles
or just bodies)
Slice the squid with a knife or, better yet, cut it into bite-sized pieces using
kitchen shears.
Bring a sauté pan up to medium heat. You want the pan hot enough so that the squid
will quickly come to temperature. Add a small amount of olive oil—enough to coat the pan
thinly when swirled—and drop the squid into the pan.
Use a wooden spoon or silicone spatula to stir the squid. Take note when it starts
to turn white—it should become subtly less translucent—and cook for another 30 seconds
or so. Add to the pan and toss to combine:
1 cup (250g) diced tomato (about 2 medium tomatoes,
seeds removed)1 tablespoon (2g) fresh herbs such as oregano or
parsley¼ teaspoon sea salt
Ground pepper to taste
Transfer squid and tomato topping to a bowl and serve with toasted bread.
Try using a pair of kitchen shears to snip the squid into small pieces
directly into a hot pan. Add tomatoes and herbs, toss, and
serve.

Duck Confit
Duck confit—duck legs cooked in fat—tastes
entirely different from duck cooked almost any other way. It’s like bacon and pork—to
quote Homer Simpson, they’re from “some wonderful, magical animal.” Good duck confit
is succulent, flavorful, tender, mouth-watering, and perhaps a bit salty. Even if
you’re not otherwise a fan of duck, give duck confit a chance.
As you can probably tell, I’m a pragmatic cook. Traditional recipes for
duck confit prescribe a long, drawn-out affair, which is fine for a leisurely Sunday
afternoon spent in the company of friends and a bottle of good wine, but doesn’t line
up well with my idea of keeping things simple.
Cooking duck “confit-style” is all about converting tough collagen
proteins into gelatin. While this isn’t a fast chemical reaction, it’s a simple one to
trigger: hold the meat at a low temperature for long enough, and the collagen proteins
denature and eventually hydrolyze.
The secret to duck confit is in the time and temperature, not the actual
cooking technique. The upshot? You can make duck confit in a slow cooker or in an oven
set at an ultra-low temperature. The fat that the duck is cooked in doesn’t matter
either; some experiments have shown that duck confit cooked in water and then coated
in oil is indistinguishable from traditionally cooked duck confit. Regardless,
definitely skip the exotic block of duck fat; duck legs are expensive enough as it
is.

Rub salt into the outside of the duck legs, covering both the side with skin and the
side with meat exposed. I use roughly 1 tablespoon (18g) of salt per duck leg; you want
enough to coat the outside thoroughly.
Place the salted duck legs in a bowl or plastic bag and store them in the fridge for
several hours to brine.
Note:
Remember: store raw meats in the bottom of the fridge so if they drip the runoff
won’t contaminate fresh produce or ready-to-eat foods.
Salting the meat adds flavor and draws out a little bit of the moisture, but if
you’re in a real rush, you can skip this step and just lightly coat the duck legs with a
few pinches of salt.
After dry-brining the duck legs, wash off all the salt. At this point, you have a
choice of heat sources. Duck confit is about cooking via convection heat with the energy
being imparted into the meat by the surrounding fat. Regardless of heat source, the duck
legs should be entirely submerged in oil. With careful arrangement and the right size
pan, you’ll find that it doesn’t take much oil to cover them. I generally use olive or
canola oil and save the oil after cooking for use in other dishes.
Note:
Note that the oil after cooking will be a blend of duck fat and your starting oil.
You can also use it for things like sautéing greens and shallow-frying
potatoes.
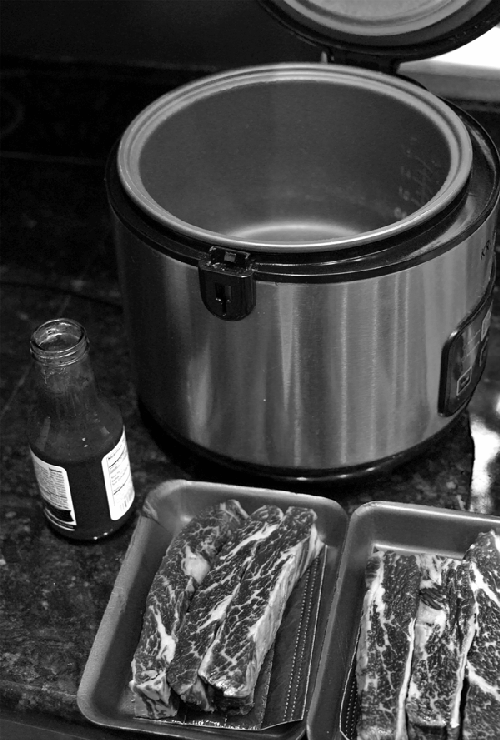
Slow-cooker method
Arrange duck legs in bowl of slow cooker or multipurpose rice cooker. Cover with
oil and set to slow-cook mode for at least 6 hours (preferably 10 to 12).
Oven method
Arrange duck legs in an oven-safe pan and cover with oil. Place in oven set at
170°F / 77°C for a minimum of six hours. (200°F / 95°C will work, but avoid anything
hotter to prevent steaming the meat.)
The duck legs will become more tender with longer cook times. I’ve cooked batches of
36 duck legs overnight using a large pot held at temperature in an oven. If you do cook
a large batch, remember that the core temperature needs to get to about 140°F / 60°C
within two hours. In this case, heat the oil up to ~250°F / 120°C before placing the
duck legs in it. This way, the hot oil will impart a solid thermal kick to get the cold
legs up to temperature faster.
Duck leg that has been cooked at low heat for a long time falls apart
easily, because most of the collagen and connective tissues that normally hold
muscles together are gone.
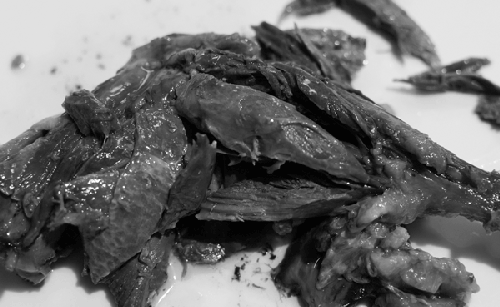
After cooking, the duck skin will still be flabby and, frankly, gross. But the meat
should be tender and yield with a bit of poking. You can either remove the skin (pan
sear it by itself for duck lardons!) or score the skin with a knife and then pan sear
the skin side of the duck to crisp it up.
If you are not going to use the duck legs straightaway, store them in the
fridge.
Notes
Traditional recipes call for duck fat instead of olive oil. One
advantage to the duck fat is that, upon cooling to room temperature, it
solidifies, encasing and sealing the duck leg in a sterilized layer of fat,
somewhat like how some jams are preserved with a wax seal. If you were living in
France a century ago, this would’ve been a great way to preserve duck legs for a
long winter, but with the invention of refrigeration and modern grocery stores,
there’s no need for the duck fat to store the meat safely for the few days it
might last. Use olive oil. It’s cheaper and healthier.If you pour off the oil and liquid into another container, a layer of
gelatin will separate out on the bottom once it cools. Use that gelatin! Try
tossing it into soups.