Initializing the Kitchen : Approaching the Kitchen

So you’ve picked out a recipe to start
with and you’re raring to go. Now what? Beyond the grocery shopping list, there are a few
things you can do before putting the knife to the cutting board to avoid mishaps while
cooking.

1. Calibrating Your Instruments

A scientist can only run experiments and make observations up to the level of accuracy
that his equipment allows. This isn’t to say that you need to approach the kitchen with
the same rigor that a scientist shows at the lab bench, but if you’re trying to bake
cookies or roast a chicken and your oven is off by 50°F / 28°C, your results will be less
than desirable. The largest variance in most kitchen equipment is usually the oven, and it
can be hard to tell if your oven is running cold or hot just by feel. (Dull knives are
also a common misdemeanor; more on that later.) Check and calibrate your oven using an
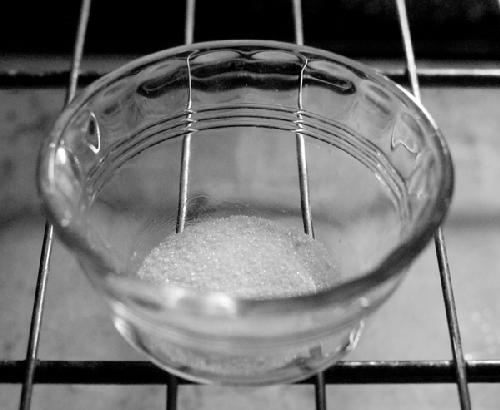
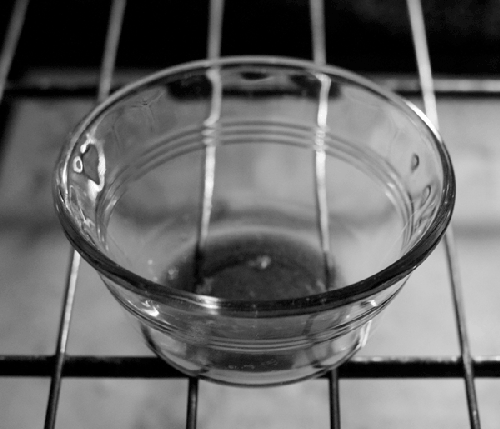
oven thermometer. On the road visiting someone and don’t trust their oven? See The Two Things You Should Do to Your Oven RIGHT NOW, below, for instructions on
calibrating an oven using sugar.

The Two Things You Should Do to Your Oven RIGHT NOW

One piece of equipment that you’re probably stuck with is your oven. What makes an
oven “good” is its ability to accurately measure and regulate heat. Since so many
reactions in cooking are about controlling the rate of chemical reactions, an oven that
keeps a steady temperature and isn’t too cold or too hot can make a huge difference in
your cooking and baking.

Improve your oven’s recovery time and even out the heat:
keep a pizza stone in the oven
. Say you’re baking cookies: oven set to
350°F / 180°C, cookies on pan, ready to go. In an empty oven, the only thing hot is the
air and the oven walls, and opening the door to pop the cookies in leaves you with just
hot oven walls. I find I get much better results by keeping a pizza stone on the very
bottom rack in my oven, with a rack directly above it. (Don’t place the cookie sheet
directly on the pizza stone!)

The pizza stone does two things. First, it acts as a thermal mass, meaning faster
recovery times for the hot air lost when you open the door to put your cookies in.
Second, if you have an electric oven, the pizza stone serves as a diffuser between the
heating element and the bottom of your baking tray. The heating element emits a hefty
kick of thermal radiation, which normally hits the bottom side of whatever pan or
bakeware you put in the oven. By interposing between the heating element and the tray,
the pizza stone blocks the direct thermal radiation and evens out the temperature,
leading to a more uniform heat. For this reason, you should go for a thick, heavy pizza
stone; they’re less likely to crack, too. I’ve turned crappy ovens that burned
everything into perfectly serviceable ones capable of turning out even “picky” dishes
like soufflés just by adding a pizza stone. Just remember that like any thermal mass, a
pizza stone will add lag to heating up the oven, so make sure to allow extra time to
preheat your oven.

Calibrate your oven using sugar. I know this
sounds crazy, and yes, you should get an oven thermometer. But how do you know that the oven thermometer is
right? My three thermometers—an IR thermometer, a probe thermometer, and the oven’s
digital thermometer—have registered temperatures of 325°F / 163°C, 350°F / 177°C, and
380°F / 193°C, all at the same time. (They’re all designed for accurate readings in
different temperature ranges.)

It’s common practice to calibrate thermometers with ice water and boiling water
because the temperatures are based on physical properties. Sugar has a similar property
and can be used for checking the accuracy of your oven thermometer. Sucrose (table
sugar) melts at 367°F / 186°C. It turns from a powdered, granulated substance to
something resembling glass. (Caramelization is different from melting; caramelization is
due to the sugar molecules decomposing—literally losing their composition—and happens
over a range of temperatures coincidentally near the melting point.)

Pour a spoonful of sugar into an oven-safe glass bowl or onto some foil on a cookie
sheet and place in your oven, set to 350°F / 177°C. Even after an hour, it should still
be powdered. It might turn slightly brown due to decomposition, but it shouldn’t melt.
If it does, your oven is too hot. Next, turn your oven up to 375°F / 190°C. The sugar
should completely melt within 15 minutes or so. If it doesn’t, your oven is calibrated
too cold. Check to see if your oven has either an adjustment knob or a calibration
offset setting; otherwise, just keep in mind the offset when setting the temperature.
Note that your oven will cycle a bit above and below the target temperature: the oven
will overshoot its target temperature, then turn off, cool down, turn back on, etc. It’s
possible that your oven could be “correctly” calibrated but still melt the sugar when
set to 350°F / 177°C due to this overshooting, but it would have to overshoot by about
15°F / 8°C.


Sugar at 350°F / 177°C.


Sugar at 375°F / 190°C.


2. Prepping Ingredients

When making a meal, start by prepping your ingredients before you begin the cooking
process. Read through the entire recipe, and get out everything you need so you don’t have
to go hunting in the cupboards or the fridge halfway through. Making stir-fry? Slice the
vegetables into a bowl and set it aside before you start cooking. In some cases, you can
do the prep work well in advance of when you start cooking the meal. Restaurants wash,
cut, and store ingredients hours or even days ahead of when they’re needed. The stages of
prepping and cooking are like the stages of compiling and executing in software
programming. If compiling is looking through all the steps and assembling the instructions
into a single stream of optimized commands that are ready to be executed, the prep stage
of cooking is similarly “precomputing” as much of the work as possible so that, when it’s
time to fire off the recipe, you can execute it as quickly and easily as possible.

The mise en place technique (French for “put in place”) involves
laying out all the ingredients and utensils needed to cook a dish before starting. Think
of it like cache priming in computer programming: mise en place is equivalent to
prefetching the various bits you’ll need while executing to avoid cache misses. If
you are going to prepare the same dish multiple times (say, omelets for a large brunch),
having a bunch of containers ready with the various fillings in them will allow you to
work quickly. Mise en place isn’t an absolute necessity, although it
does generally make the cooking process smoother. Measure out the ingredients at this
stage whenever possible; this way you’ll have a chance to discover if you’re short of a
critical ingredient (or if it’s gone bad!) before committing to the cooking process. It
also helps avoid those panicked moments of trying to locate a strainer that’s wandered off
while a sauce that needs immediate straining cools down. (Happens to me all the time…)
Sure, a “just-in-time” approach is fine for simple meals. However, if you’re cooking for a
large number of people or attempting a particularly complicated menu, keep the mise en
place approach in mind.