Air: Baking’s Key Variable – Biological Leaveners (part 2) – Yeast in breads

1.2. Yeast in breads

Baker’s yeast comes in three varieties: instant, active dry, and fresh. All three
types are the same strain: Saccharomyces cerevisiae. The instant
and active dry versions have been dried so as to form a protective shell of dead yeast
cells surrounding some still-living cells. Fresh yeast—also called cake
yeast
because it is sold in a compressed cake form—is essentially a block
of the yeast without any protective shell, giving it a much shorter shelf life (well,
fridge life): cake yeast is good for about two weeks in the fridge, whereas instant
yeast is good for about a year and active dry yeast is good for about two years in the
cupboard.

Instant and active dry yeast are essentially identical, with two differences. First,
active dry yeast has a thicker protective shell around it. This gives it a longer shelf
life, but it also means it must be soaked in water before use to soften up the
protective shell. The second difference is that the quantity of active yeast cells in
active dry yeast is lower than in instant yeast, because the thicker protective shell
takes up more space: when a recipe calls for 1 teaspoon (2.9g) of active dry yeast, you
can substitute in ¾ teaspoon (2.3g) of instant yeast.

Instant yeast is
the easiest to work with: add it directly into the dry ingredients and mix. Unless you
have reason to work with active dry or cake yeast, use instant yeast. Remember to store
it in the fridge!


Note:

If you have active dry yeast instead, you will need to proof it first.
Proofing—soaking in lukewarm water—softens the hard shell around the active dry yeast
granules. Use lukewarm water (105°F / 40°C). If the water is below 100°F / 38°C, an
amino acid called glutathione will leak out from the cell walls and make your dough
sticky; if it’s above 120°F / 49°C, the yeast will show very little activity.

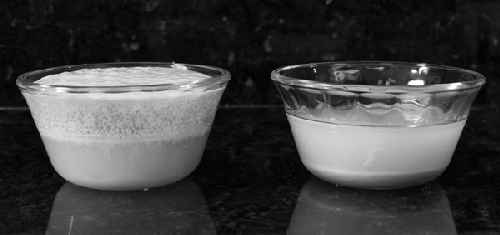
Don’t be worried about too-hot tap water killing your yeast. Yeast actually dies
somewhere above 131°F / 55°C, so too-hot water from the tap shouldn’t be able to kill
the yeast; it just slows down reproduction. You can confirm this by filling a glass
with your hottest tap water, dumping in some yeast, waiting a few minutes to give the
yeast time to come up to temperature, and then adding some flour and watching the
yeast still do its thing.

You can skip all this proofing and temperature stuff by just using instant
yeast.


Check Your Yeast!

In baking, proofing can refer to a few different things:
checking that your yeast is alive, allowing the dough to rise, or allowing the shaped
loaf to rest and rise before baking.

Whatever you call it, you should make sure that your yeast is alive before
proceeding to work with it. Measure out 2 teaspoons (10g) of the yeast and 1 teaspoon
(5g) of sugar into a glass and add ½ cup (120g) of lukewarm water (105°F / 40°C). Stir
and let rest for two to three minutes.

You should see small bubbles forming on the surface. If you don’t, your yeast is
dead—time to head to the store.

You probably don’t need to check your yeast every time you use it, especially if
you’re using instant yeast and storing it in your fridge. If you notice that your
doughs aren’t rising as expected, though, give the yeast a quick check.


Proofed yeast will bubble up and foam (left); dead yeast will
separate out and not foam (right).


Bread—Traditional Method

If you’ve
never made bread before, a simple loaf is easy enough to make, and perfecting it
will keep you busy for many years. This is one of those recipes that’s worth making
several days in a row, making one change at a time to understand how your changes
impact the final loaf.

In a large bowl, whisk to thoroughly combine:

1 ½ cups (180g) bread flour

1 ½ cups (180g) whole wheat flour

3 tablespoons (30g) gluten flour
(optional)

1 ½ teaspoons salt (2 teaspoons if using kosher or
flake salt)

1 ½ teaspoons instant yeast
(
not
active dry yeast)

Add:

1 cup (240g) water

1 teaspoon (7g) honey

Stir just to incorporate—maybe 10 strokes with a spoon—and allow to rest for 20 to
30 minutes, during which the flour will absorb the water (called
autolysing).

After the dough has undergone autolysis, knead it. You can do this against a
cutting board, pressing down on the dough with the palm of your hand, pushing it away
from yourself, and then folding it back up on top of itself, rotating the ball every
few times. I sometimes just hold the dough in my hands and work it, stretching it and
folding it, but this is probably unorthodox. Continue kneading the dough until it
passes the “stretch test”: tear off a small piece of the dough and stretch it. It
shouldn’t tear; if it does, continue kneading.

Form the dough into a ball and let it rest in the large bowl, covered with plastic
wrap (spray it with nonstick spray to avoid it sticking), until it doubles in size,
normally about 4 to 6 hours. Try to store the dough someplace where the temperature is
between 72°F / 22°C and 80°F / 26.5°C. If the dough is kept too warm—say, if you’re in
a hot climate, or it’s too close to a heating vent—it will double in size more
quickly, so keep an eye on it and use common sense. Warmer—and thus faster—isn’t
necessarily better, though: longer rest times will allow for better flavor
development.

After the dough has risen, give it a quick second kneading—more of a quick massage
to work out any large gas bubbles—and form it into a tight ball. Coat it with a light
dusting of flour, place it on a pizza peel (or piece of cardboard), cover it with
plastic wrap again, and allow it to rest for another hour or two.


Note:

Yeast produces both acetic and lactic acid at different rates depending upon
temperature. Ideal rising temperature is between 72°F / 22°C and 80°F /
26.5°C.

If kept too cold, dough will be tough and flat due to insufficient gas
production, and the final loaf will have uneven crumb, irregular holes, and a
too-dark, hard crust.

On the other hand, dough risen in an environment too warm will be dry, lack
elasticity, and break when stretched, and the final loaf will have sour-tasting
crumbs, large cells with thick walls, and a pale/whitish crust.


While waiting for the dough to proof, place either a pizza stone or a baking stone
in your oven and set it to 425°F / 220°C. (No pizza stone? Use a cast iron griddle or
cast iron pan, flipped upside down.) Make sure that the oven is fully heated before
baking—a full hour of preheating is not unreasonable.

Just before transferring the dough to the oven, pour a
cup or two of boiling water into a baking pan or cookie sheet and set it on a shelf
below the baking stone. (Use an old cookie sheet; the water may leave a hard-to-clean
residue on it.) Alternatively, you can use a spray bottle to squirt the inside of the
oven a dozen or so times to increase the humidity. (Be careful not to hit the light
bulb inside: it can shatter.) Upping the humidity will help impart heat into the bread
faster and will also prevent the outside of the loaf from setting prematurely, giving
the bread better oven spring—the rise that occurs as the loaf
heats up in the oven before the outside of the loaf sets and becomes, essentially, an
exoskeleton.

With a serrated knife, lightly slash the top of the loaf with an “X” and then
place it into the oven. Bake until the crust is golden brown and the loaf gives a
hollow sound when rapped on the bottom with your knuckles, about 30 minutes. You can
also check for doneness using an instant-read thermometer; the internal temperature
should be above 205°F / 96°C and ideally around 210°F / 98.5°C, which is the
temperature at which starches in flour break down.

Allow the bread to cool for at least 30 minutes or so before slicing; it needs to
cool sufficiently for the starches to gelatinize and set.

Notes

  • If even at the ideal rising and baking temperatures your bread is
    still coming out too dense, try reducing the amount of whole wheat flour to 1
    cup (120g) and increasing the bread flour to 2 cups (240g).

  • For a slightly more complicated method, try starting with a sponge:
    a prefermentation of flour, water, and yeast that allows for better flavor
    development. Instead of adding all the flour and water together at the
    beginning, mix half of the flour (180g) with 4/7 (140g) of the water (ideally,
    at 75°F / 24°C—if it’s any warmer, oxidation will impact the flavor) and all of
    the yeast (7g), and allow that to rise until bubbles start to form on the
    surface and the sponge starts to fall. Once this stage is reached, mix the
    sponge up with the rest of the water (100g), add the rest of the flour (180g)
    and salt (7g), and allow the mixture to rise per the earlier instructions. 

  • While the exact science of what causes bread to go stale is still
    unknown, a couple of different mechanisms are reasonable suspects. One thought
    is that, upon baking, starches in flour convert to a form that can bind with
    water, but that they slowly recrystallize after baking and in doing so release
    the water, which then gets absorbed by the gluten, changing the texture of the
    crumb. Then there’s the crust, which draws away some moisture from the middle of
    the bread, causing the texture of the crust to change. Regardless of the exact
    mechanism, storing bread in the fridge speeds up these changes in texture while
    freezing does not, so keep your bread at room temperature or freeze it. (The
    only benefit to storing bread in the fridge is that it slows the growth of some
    types of mold.) Toasting the bread above the temperature at which starches
    gelatinize reverses some of these changes.

  • Try adding rosemary, olives, or diced and sautéed onion during the
    second kneading. Or, use only bread flour and add some large chunks of
    bittersweet chocolate.


Yeast Waffles

Baker’s yeast contains a number of enzymes,
one of which, zymase, converts simple sugars (dextrose and fructose) into carbon
dioxide and alcohol. It’s this enzyme that gives yeast its rising capabilities.
Zymase doesn’t break down lactose sugars, though, so doughs and batters made with
milk will end up tasting sweeter. This is why some bread recipes call for milk and
why foods like yeast waffles come out with a rich, sweet flavor.

At least two hours in advance, but preferably the night before, measure out and
whisk together:

1¾ cups (450g) milk (whole,
preferably)

½ cup (115g) melted butter

2 teaspoons (10g) sugar or honey

1 teaspoon (6g) salt (table salt—not the kosher or
flaky type)

2 ½ cups (300g) flour (all-purpose)

1 tablespoon (15g) instant yeast
(
not
active dry yeast)

2 large (120g) eggs

Cover and store at room temperature. Make sure to use a large bowl or container
with enough headspace to allow the batter to rise.

Briefly stir the batter and then bake in your waffle iron per instructions of your
waffle iron manufacturer.

Notes

  • In baking, use table salt, not kosher or flake salt, because the
    finer-grained salt will mix more uniformly into the batter.

  • Try using honey, maple syrup, or agave nectar instead of sugar, and
    try substituting whole wheat flour or oat flour for half of the all-purpose
    flour.

  • If your waffles come out not as crispy as you like, toss them in an
    oven preheated to 250°F / 120°C—hot enough to quickly evaporate out water, cold
    enough to avoid caramelization and Maillard reactions.